
An alternative anniversary card

It's my aunt and uncle's 40th wedding anniversary next month (you will already have seen the stitch I made for the occasion) so today I decided to do an anniversary card for them. One thing I have noticed is that cards that are for a couple (ie not the ones from a wife to her husband) all seem a little bit girly. All well and good, but men celebrate anniversaries too, and the best card will be for both members of a couple, whether a hetero or homosexual couple.


Anyway, enough drivel, here's to the card! I've been looking at Tim Holtz tags lately, and he has been revisiting some of his techniques. I took a few of those techniques for the card.


This is the first technique - stencil embossing. Basically you use a stencil and add distress ink through it, then before the ink dries you add clear embossing powder, take off the excess and heat set it. You get a lovely shine to the hearts which you can just see at the top of the picture.

 
A slightly different technique to what Tim does, basically I added some stencil words in texture paste and then added distress embossing powder over the top. Leave it to dry completely (one hour at least) before heat setting the powder. I didn't wait so it's ended a little paler than it should have. Still looks good.

 
Here is the second technique - industrial grunge (something like that anyway). Basically you emboss some foil then use black soot paint and a blending pad to get the paint into the grooves, giving the whole thing an industrial feel. Works best with cogs, rivets, clocks etc but works well with the heart folder here.

 
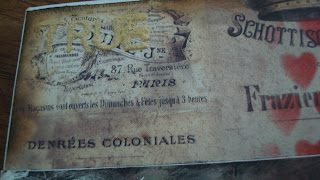
I used some Madame Payraud paper for the background and distress inked the sides before putting the foil in the centre. I also used the same paper for the hearts, die cutting them and inking the sides with barn door and a little bit of stickles, before die cutting 40 and painting it in brass. Finally I tied some twine around the card, adding a love heart charm. The whole thing was then put on white card.

 
So there you have it! An anniversary card that is not all pink and fluffy, but not too manly either.
 
Happy crafting
Ems

Comments

Post a Comment

Popular posts from this blog

What to do when you hit a wall?

Sorry guys, this is gonna be another pic-lite one. This is for two reasons. The first is because I decided to be a complete idiot the other day and crack my head open on the door at work, so I have to take things easy for a couple of days. The second is strange. I woke up the other day and it was as if someone had flipped a switch. All of the self-confidence that I had built up through my crafting over the last year has disappeared - just like that. I've spent the large majority of my life thinking that I am not good enough; in what I do, what I say, in short, in who I am. With crafts I was finally starting to believe in myself. So it is very hard at the moment, as I feel that I am right back at square one. I am hoping that this is temporary, and that I will soon feel myself again. I have to remind myself that I am very early in my crafting journey, and there are bound to be bumps along the way. I am aware that it is probably linked to my current state of high anxiety, as susta

Altering again!

My craft mojo came back! I decided to treat myself the other day to a new paper pad, and chose G45 Steampunk Spells. Graphic 45 papers are expensive but boy are they worth it! I wish I'd got into them sooner as there are some older pads that are gorgeous, but unavailable now. Anyway, once I got the pad and overcame the urge to just admire the paper and do nothing with it, I got to work. I decided to try to make something to enter into a couple of challenges, namely the  Craft room something old, something new challenge  and  That's Crafty! Girl power challenge . The first thing to do was to decide what to make. I was going to do a card, but then I found this: This was a cutlery drawer that a friend gave me. To be honest I have been using it to store sharpies in, but no more. Here it is now: What a change! I started by painting it in black acrylic, then got to work on each section. I used the Clockworks paper for the background, cut out some clocks fro

Altering things..

I've always loved the idea of buying something and doing it up but haven't done it till now. I bought a bird cage the other day from Store Twenty One for a fiver, and then got to work. I started by finding some paper for the inside of the cage. I ended up using the free paper that had arrived that morning from Cardmaking and Papercraft magazine, and some kraft card. I also found some blue ribbon to which I added some more kraft paper that had been die cut. I then got my only set of framelits, and cut alternate sizes of the patterned and kraft card, all inked with tattered rose distress ink and then stamped with a sentiment. The only other thing on the inside of the cage was a length of twine to which I added some blue pegs.  On the outside of the cage I added some yellow flowers. If you look closely you can see some droplets of water on them, another plus with the choice of glossy accents as a glue is that it makes perfect raindrops. I coated some chi