Never thought I would actually get this done, but over the last week I have finished the box! Here are the last pics of it
.jpg)
.jpg)

The May, June and July box are together. The May one originally had a blue wave background but I changed my mind about what to do with it so I recovered it with green. I then added a branch that I inked with gathered twigs, and added raspberry fizz flowersoft, so it looks like a cherry blssom tree. The June one is a simple rose I had in a Crafty Creatives box, as rose is the flower for June. The background says are we there yet? something every child says on a long car journey. The July box is a sand background and a beach house, made with blue striped paper and red paper with added stickles. The life preserve is just a piece of card coloured with promarkers and coated with glossy accents, and the crab in a bucket charm was from my stash. I finished the three months by making some bunting out of some twine I had and papers free with a magazine, and strung it along all three.

 October was an obvious choice - halloween! I started off with a black background and added some white rub ons. I then got some skull beads, added some red beads and attached them to head pins, to make them look like totem poles. I added the polymer clay grave and pumpkins I made ages ago, and got some grungeboard (a sign and the letters BOO), inked and stickled them with black soot and rusty hinge, then attached it to the top of the box, then attached the shrink plastic ghosts to them.


I actually kept the piece of card I cut May's branch out of, and decided to use that by inking and stickling with weathered twigs. I then added shrink plastic leaves, and an owl pendant I got from the woodland goody bag from Crafty Creatives. I made the owls eyes by using forest moss stickles and then glossy accents. It actually looks like semi precious beads!
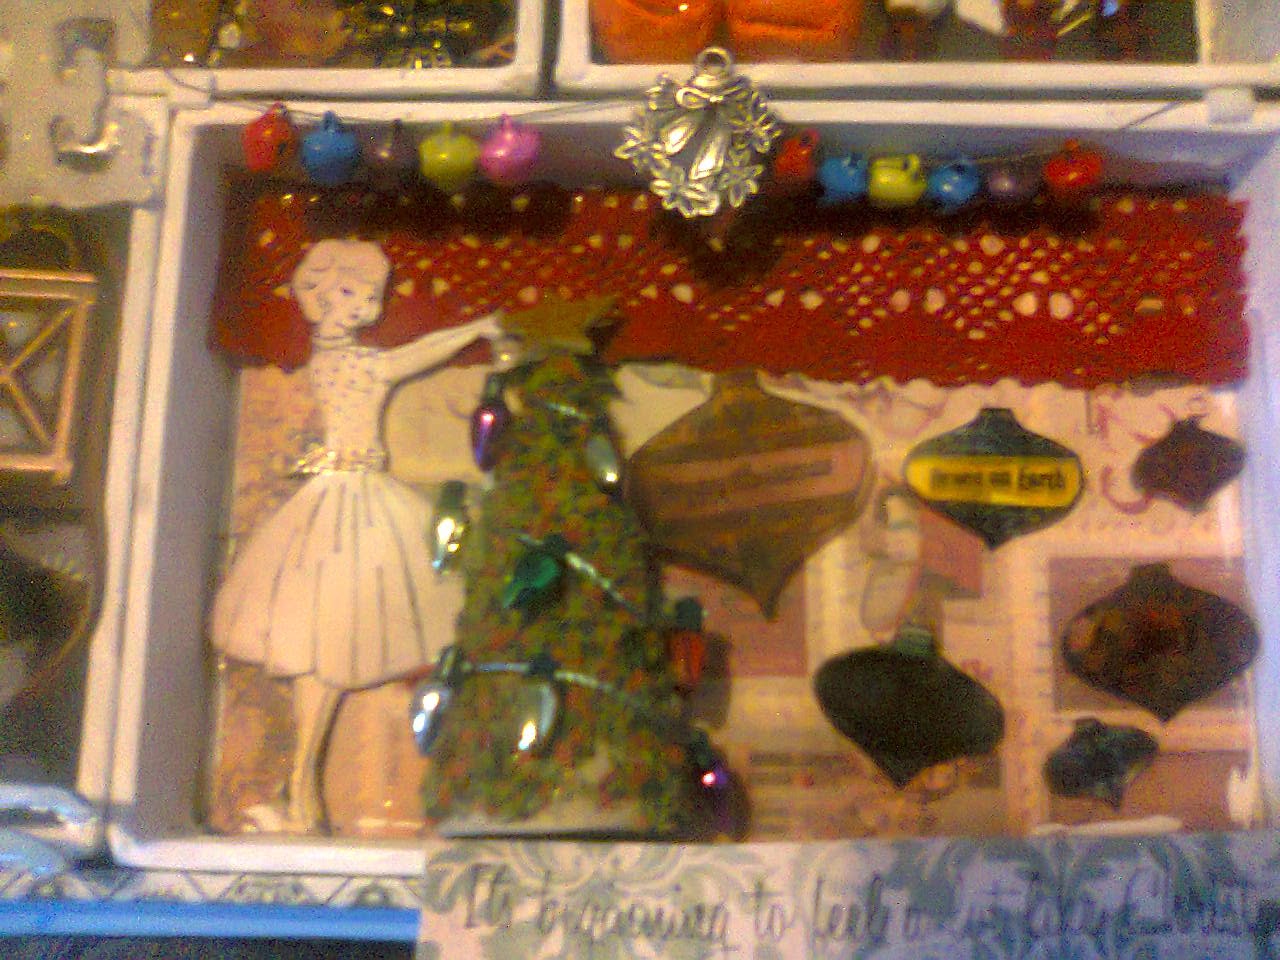
Again, December is obvious - my favourite time of year; Christmas! I decided to go with christmas decs, so I covered a cone with vintage flowersoft and added a string of lights and a gold star. I put lace along the top of the box (both festive and it hides the white paint!) then stamped a vintage woman, inked her with tattered rose and cut her out. I then stamped some baubles, coloured them with sharpies (much better than promarkers for shrink plastic) then shrunk them. I stamped the sentiment ' It's beginning to feel a lot like christmas' on a piece of paper and stuck it to the bottom of the box. Lastly I strung some jingle bells on some thread and stuck it to the top of the box, with a metal wreath in the middle.
The last box is January, so I decided on New Year. I had trouble signifying fireworks but I found some wooden wheels, inked them with black ink and used different coloured stickles. They kind of look like fireworks. I found a clock, put glossy accents in it and attached it to a Tim Holtz fragment with steampunk paper behind it. The sign is a resolution I think we can all follow; take time to love the little things in life. Finally I added a bell at the top to signify the bells that strike midnight on the new year.
So that's it! I was worried that I would give up halfway, that it wouldn't be good enough when I had finished and that I would just end up disappointed but I have surprised myself. Looking at the whole thing it actually works well. Of course I have made mistakes along the way, and I am still working on my techniques, but it has turned out a lot better than I had hoped it would be. I may even do another one in future!
Wow,Emma,love it,especially the Christmas box. You have made a really great piece of wonderful art here,I hope you are proud of it and I hope it's on display somewhere too :)
ReplyDeleteHave a great weekend
Hugs
Donna xx
Congratulations on the completion of your project. Very, very well done!
ReplyDeleteI think my favourite is the Christmas box. The whole thing is so perfect - from the stamped lady to the tree, the bells, .. oh, everything. Perfect! ~ Cobs.