First the Beadhaul box review. This was very late this time, and I honestly don't know how long it will continue as the owner appears to be struggling. As much as I like these boxes, I would rather she give them up and focus her time on her young family if they are stressing her out so much. Anyway, to the April box.
The theme is summer loving - so expect bright things!
Glass beads. I like these, the little flick of red reminds me of flames.
Yellow beads. Not a colour I would usually go for, but they are nice.
Daisy charms. I think I am going to paint these before doing anything with them. As you can see, the centre is poorly painted.
Seed beads. What we need are tutorials for basic beading techniques with these.
Flower charms/beads. Quite nice, I like the pastel colours.
Bee charm. I love this. Understated, yet a perfect charm for summer.
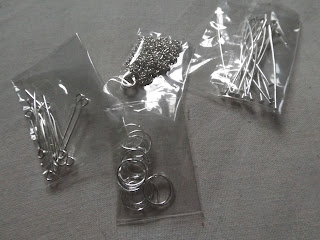
Silver findings. Unusual given the charm is gold, but always useful. Here are head pins, eye pins, jump rings and a chain.
Fruit is in apparently, as it's getting to nicer weather. These are unusual, but well made.
I don't like these. They are designed for a child, and they are poorly painted. A rare miss.
Flower beads. These are cool. In fact I have already used some.
Silver flower charms. Nice item, and could be used for a number of things.
Blue ladybirds? Cool!
Shell beads. These are gorgeous! A bright array of colours, and the shine on them is beautiful.
The theme is summer loving - so expect bright things!
Glass beads. I like these, the little flick of red reminds me of flames.
Yellow beads. Not a colour I would usually go for, but they are nice.
Daisy charms. I think I am going to paint these before doing anything with them. As you can see, the centre is poorly painted.
Seed beads. What we need are tutorials for basic beading techniques with these.
Flower charms/beads. Quite nice, I like the pastel colours.
Bee charm. I love this. Understated, yet a perfect charm for summer.
Silver findings. Unusual given the charm is gold, but always useful. Here are head pins, eye pins, jump rings and a chain.
I don't like these. They are designed for a child, and they are poorly painted. A rare miss.
Flower beads. These are cool. In fact I have already used some.
Silver flower charms. Nice item, and could be used for a number of things.
Blue ladybirds? Cool!
Shell beads. These are gorgeous! A bright array of colours, and the shine on them is beautiful.
Sun and cloud charms. Another lovely item. These would be a perfect finishing touch to a bracelet or necklace.
I have already made some earrings from this box.
Such a simple design, but the shell beads make it pop. The findings were from my own stash.
Overall I liked this box, but I wasn't as excited about it as I have been with previous ones. Whether this was because of the owner's message or not I do not know. There are some amazing items, but there are a few duds as well.
I mentioned a few weeks ago that the cut out from the Docrafts seaside scene dies was perfect for a different design. Well, I finally made it.
The orange bit was perfect for a pacman ghost! I made a little scene with black card, strips of blue card and the dots came from a hole punch. I added eyes onto the ghost (blue dots also courtesy of hole punch) and then die cut the sentiment in yellow, replacing the C in Carl with a pacman.
I've also dug out an old stitch - Winter Village. Here is the progress so far.
Not much progress from where I was, but this is easily the hardest stitch I have ever done. I've decided to concentrate on the sky for now.
flour, eggs and butter
mixed in equal ratios
don't forget butter!
Confession now - I have never made a cake from scratch on my own. I have made a Victoria Sponge with the brownies years ago (that's brownies the group, not the confectionary treat) and I have made cakes from packet mix. So this week, as it was my brother's birthday, I set out to rectify this. I used a recipe from the Hummingbird Bakery book for chocolate bundt cake. The haiku doesn't work for this recipe, as it doesn't use butter, it uses mayonnaise! It may sound strange but if you think about it, mayo is basically eggs and oil, and oil is so much better than butter if you want a moist cake.
Now, I am never going to be auditioning for the British Bake Off, but overall I was pleased with the cake. As I used a normal tin it took a little longer than it would have done in a bundt cake tin, but it cooked through in the end, only sunk a little (which I copiously covered with the glaze) and it tasted delicious.
As you can see I tried to drizzle the glaze artistically on the side, but I ended up with more glaze on the side than on the cake!
That's it for this week. Until next time - happy crafting! (Why do I hear a Looney Tunes style jingle after that?)
Th-th-th-th-that's all folks!


Comments
Post a Comment